Thứ Năm, 30 tháng 12, 2010

working with gridview in asp.net

working with gridview in asp.net: "

upcomming article

Gridview control trong asp.net là control hiển thị dữ liệu, xây dựng sẵn các chức năng như: phân trang, xóa và chỉnh sửa dữ liệu, nó cho phép chúng ta template tùy thích, trong bài blog này chúng ta sẽ thấy gridview được dùng như thế nào để làm việc với dữ liệu.

Ở đây mình sẽ dùng ADO.NET Entity Framework và table Users có schema:

customer table schema

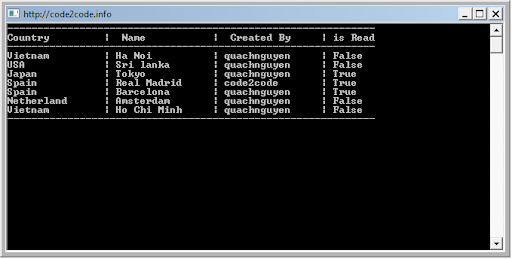
Và data của table Users:

user's table data

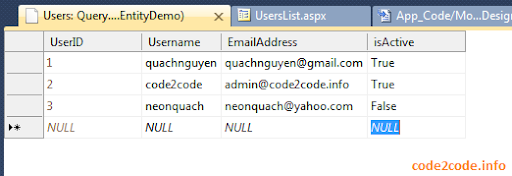
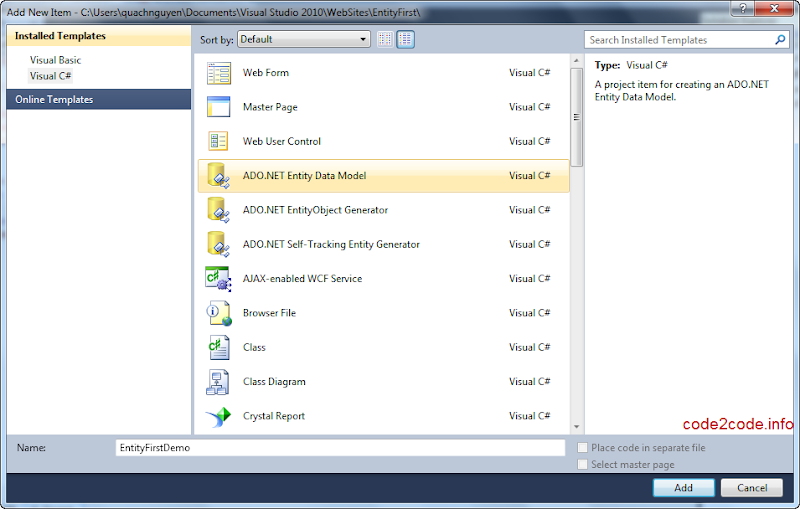
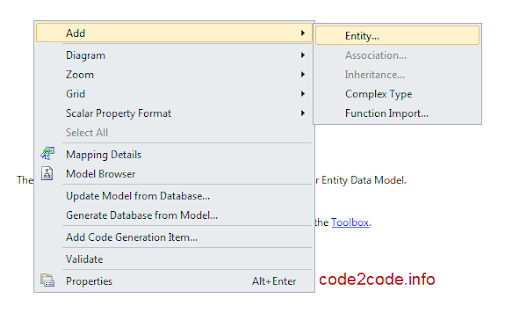
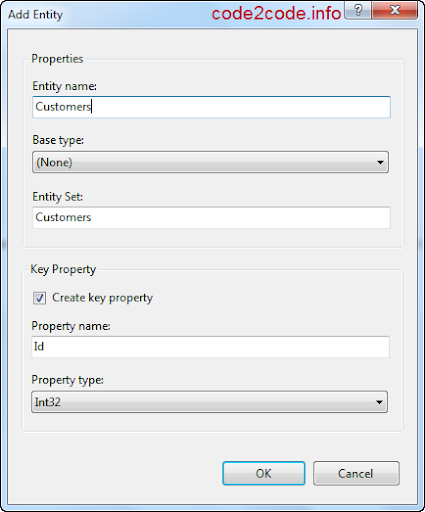
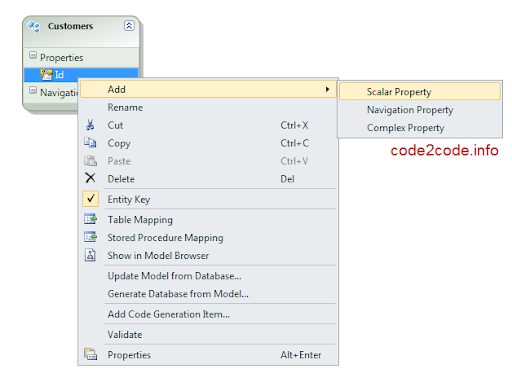
Nhấp chuột phải vào website chọn Add New Item...Sau đó chọn ADO.NET Entity Data Model, chọn connect tới csdl có chứa table Users, mọi việc phải được hoàn tất cho đến khi Entity Users hiển thị trên visual studio's surface.

Sau đó tạo 1 page UserList.aspx, và kéo control GridView vào page từ toolbox và đặt tên là grdviewUsers.

Binding Entity Users vào grdviewUsers:
Mình viết 1 hàm Bind tất cả các users từ db lên grid:


private void BindUsers()
{
using (EntityDemoModel.EntityDemoEntities context = new EntityDemoModel.EntityDemoEntities())
{
grdviewUsers.DataSource = context.Users;
grdviewUsers.DataBind();
}
}

Khi đó trong hàm page load mình sẽ call function này:


protected void Page_Load(object sender, EventArgs e)
{
if (!Page.IsPostBack)
{
BindUsers();
}
}

Paging cho grdUser: để paging chúng ta set thuộc tính AllowPaging của gridview là True và set pagesize = 5 (note nhập thêm dữ liệu 6-7 records)


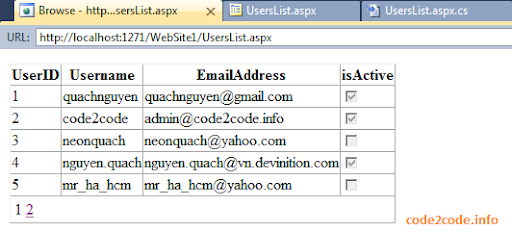
Ok giờ nếu chúng ta nhấn vào page số 2 chúng ta sẽ gặp lổi: The GridView 'grdviewUsers' fired event PageIndexChanging which wasn't handled. Lổi này do chúng ta chưa xữ lý sự kiện paging cho gridview user.


protected void grdviewUsers_PageIndexChanging(object sender, GridViewPageEventArgs e)
{
grdviewUsers.PageIndex = e.NewPageIndex;
BindUsers();
}

Template cho gridview và bật chức năng update và delete cho gridview: Phần header của gridview cần chỉnh lại ví dụ: User Id...Username...Email Address, chọn grdviewUser và từ của sổ smartTag chọn Edit column


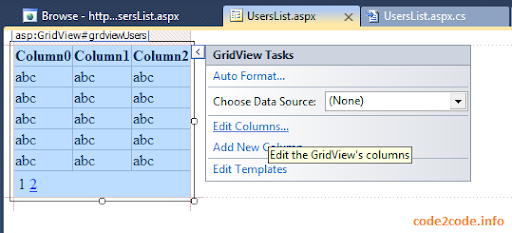
Column UserID: từ BoundField → Add → Set Header: User ID → Set Data Field: userid → Convert this field into template field. Uncheck Auto Generate field


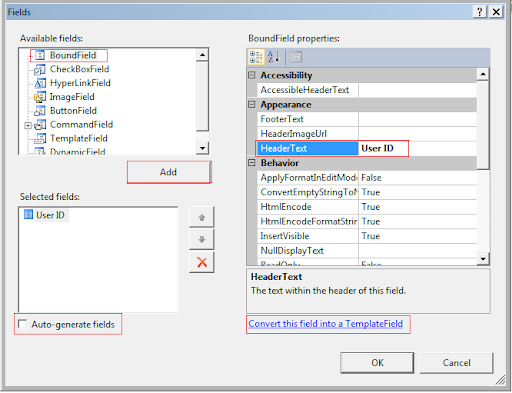
Quá trình này lập lại cho đến column isActive, thì chúng ta chọn CheckboxField thay vì BoundField → ItemStyle → HorizontalAlign → Center để canh giữa cho checkbox .

Markup code sau khi template:


        <asp:GridView ID='grdviewUsers' runat='server' AllowPaging='True' PageSize='5' AutoGenerateColumns='False'
AutoGenerateDeleteButton='True' AutoGenerateEditButton='True' OnPageIndexChanging='grdviewUsers_PageIndexChanging'
OnRowCancelingEdit='grdviewUsers_RowCancelingEdit' OnRowEditing='grdviewUsers_RowEditing'
OnRowDeleting='grdviewUsers_RowDeleting' OnRowUpdating='grdviewUsers_RowUpdating'>
<Columns>
<asp:TemplateField HeaderText="User ID">
<EditItemTemplate>
<asp:Label ID='edtId' runat='server' Text='<%# Bind("userid") %>'></asp:Label>
</EditItemTemplate>
<ItemTemplate>
<asp:Label ID='lblId' runat='server' Text='<%# Bind("userid") %>'></asp:Label>
</ItemTemplate>
<ItemStyle HorizontalAlign='Center' />
</asp:TemplateField>
<asp:TemplateField HeaderText="User Name">
<EditItemTemplate>
<asp:TextBox ID='txtusername' runat='server' Text='<%# Bind("username") %>'></asp:TextBox>
</EditItemTemplate>
<ItemTemplate>
<asp:Label ID='Label2' runat='server' Text='<%# Bind("username") %>'></asp:Label>
</ItemTemplate>
</asp:TemplateField>
<asp:TemplateField HeaderText="Email Address">
<EditItemTemplate>
<asp:TextBox ID='txtemailaddress' runat='server' Text='<%# Bind("emailaddress") %>'></asp:TextBox>
</EditItemTemplate>
<ItemTemplate>
<asp:Label ID='Label3' runat='server' Text='<%# Bind("emailaddress") %>'></asp:Label>
</ItemTemplate>
</asp:TemplateField>
<asp:TemplateField HeaderText="Is Active">
<EditItemTemplate>
<asp:CheckBox ID='chkisActive' runat='server' Checked='<%# Bind("isActive") %>' />
</EditItemTemplate>
<ItemTemplate>
<asp:CheckBox ID='CheckBox1' runat='server' Checked='<%# Bind("isActive") %>' Enabled='false' />
</ItemTemplate>
<ItemStyle HorizontalAlign='Center' />
</asp:TemplateField>
</Columns>
</asp:GridView>

Bật chức năng Edit và Delete:
Chọn grdViewUser → AutoGenerateDeleteButton='True' AutoGenerateEditButton='True'


Xữ lý button Edit và Cancel:


protected void grdviewUsers_RowEditing(object sender, GridViewEditEventArgs e)
{
grdviewUsers.EditIndex = e.NewEditIndex;
BindUsers();
}

protected void grdviewUsers_RowCancelingEdit(object sender, GridViewCancelEditEventArgs e)
{
grdviewUsers.EditIndex = -1;
BindUsers();
}


Khi chúng ta nhấn vào Edit thì mặc định chúng ta có thể edit được cả field id, đế tránh trường hợp đó trong markup code của grid phần Edit Template của id chúng ta sửa thành:


<asp:TemplateField HeaderText="User ID">
<EditItemTemplate>
<asp:Label ID='edtId' runat='server' Text='<%# Bind("userid") %>'></asp:Label>
</EditItemTemplate>
<ItemTemplate>
<asp:Label ID='lblId' runat='server' Text='<%# Bind("userid") %>'></asp:Label>
</ItemTemplate>
</asp:TemplateField>

Xử lý hàm updating cho grdvewUser


protected void grdviewUsers_RowUpdating(object sender, GridViewUpdateEventArgs e)
{
Label userIdCtr = (Label)grdviewUsers.Rows[e.RowIndex].FindControl('edtId');
int userid = Convert.ToInt32(userIdCtr.Text.Trim());
TextBox txtUser = (TextBox)grdviewUsers.Rows[e.RowIndex].FindControl('txtusername');
TextBox txtEmailAddress = (TextBox)grdviewUsers.Rows[e.RowIndex].FindControl('txtemailaddress');
CheckBox isActive = (CheckBox)grdviewUsers.Rows[e.RowIndex].FindControl('chkisActive');
using (EntityDemoEntities context = new EntityDemoEntities())
{
var user = context.Users.FirstOrDefault(u => u.UserID == userid);
user.Username = txtUser.Text.Trim();
user.EmailAddress = txtEmailAddress.Text.Trim();
user.isActive = isActive.Checked;
context.SaveChanges();
}
grdviewUsers_RowCancelingEdit(null, null);
}

Tiếp tực xử lý hàm deleting


protected void grdviewUsers_RowDeleting(object sender, GridViewDeleteEventArgs e)
{
Label userIdCtr = (Label)grdviewUsers.Rows[e.RowIndex].FindControl('lblId');
int userid = Convert.ToInt32(userIdCtr.Text.Trim());
using (EntityDemoEntities context = new EntityDemoEntities())
{
var user = context.Users.FirstOrDefault(u => u.UserID == userid);
context.DeleteObject(user);
context.SaveChanges();
}
BindUsers();
}

Xong, giờ chúng ta có thể update và delete user 1 cách lập trình bằng tay.

Chúc vui

"

các công cụ hữu ích dành cho lập trình viên .Net

các công cụ hữu ích dành cho lập trình viên .Net: "

Scott Hansleman có một danh sách hấp dẫn, các công cụ phần mềm mà có thể có ích cho các nhà phát triển (developer) và người sử dụng thường xuyên trong cuộc sống hàng ngày của họ. Ý định của tôi với danh sách này không phải là để sao chép các tài nguyên hiện có mà cụ thể là danh sách một số công cụ NET. rằng các nhà phát triển có thể tìm thấy hữu ích. Có thể vào cuối ngày một số người trong số họ cần tải thêm, một số trong số họ không cần, bạn là người quyết định xem bạn có cần chúng ở tất cả hay không. Vì vậy, hãy xem danh sách bên dưới này nhé.


  • . NET Reflector - một trong những công cụ tuyệt vời mà sẽ phục vụ lâu sau khi nó đã được cài đặt. Theo tôi đây là cách tốt nhất để những gì bên dưới của NET Framework. Và có thể tìm thấy một thứ chưa được document. Tôi đã đề cập rằng đây cũng là một cách tuyệt vời để tìm hiểu cách mọi sự làm việc?


  • ReSharper - một công cụ mà sẽ tăng đáng kể tốc độ mã hóa vì nó cung cấp một tập hợp lớn các hành động cho thế hệ phân tích, mã và tái cấu trúc.


  • LINQPad - một công cụ phải có nếu bạn làm việc rất nhiều với cơ sở dữ liệu và dịch vụ OData và bạn muốn tận dụng sức mạnh của LINQ. SQL-wise, nó là nhanh hơn trong một số khía cạnh so với SQL Management Studio.


  • Visual Studio Productivity Power Tools - một phần mở rộng cho Visual Studio mà làm cho nó dễ dàng hơn để di chuyển qua các solution trong visual studio. Với màu sắc Tab khác biệt (tùy thuộc vào những gì nó thuộc về dự án) là tuyệt vời.


  • NuGet - bây giờ bạn không cần phải tự tìm kiếm một thư viện cụ thể và thêm một tham chiếu đến nó. NuGet sẽ tự động tải về và bao gồm các tham chiếu đến nó.


  • PowerCommands for Visual Studio 2010 - là phần mở rộng cho Visual Studio cho biết thêm rằng các lệnh bổ sung các solution Explorer, cho phép của bạn truy cập vào tài nguyên dự án dễ dàng hơn nhiều.


  • Silverlight Toolkit - một tập hợp các thành phần bổ sung cho ứng dụng Silverlight và WP7 (dựa trên Silverlight).


  • MailSystem.NET - nếu bạn đang tìm kiếm một thư viện thư cho NET bạn, dự án của bạn có khả năng xử lý POP, SMTP và IMAP thì điều này là đúng sự lựa chọn.


  • Sandcastle - theo ý kiến của tôi, một trong những cách tốt nhất để tạo ra tài liệu cho các dự án .NET của bạn.


  • PDFSharp - một thư viện quản lý để làm việc với các tập tin PDF, đặc biệt tạo ra PDF.


  • Ninject - dependency injector: một trong những tốt nhất mà tôi biết (mặc dù tôi vẫn thích MEF trong hầu hết các trường hợp).


  • XAMLPad - công cụ này là cài đặt mặc định khi bạn cài đặt Visual Studio như vậy sẽ không có bất kỳ hành động bổ sung cần thiết để có được nó. Nó là rất tốt cho XAML thử nghiệm (trong bối cảnh của Silverlight và WPF).


  • NUnit - một-thành lập và mainteined cũng đơn vị kiểm tra khuôn khổ cho NET.


  • xUnit - một framework dùng cho mục đính testing dành riêng cho NET.


  • MEFContrib - một tập hợp các phần mở rộng cho MEF (Quản lý năng mở rộng Framework) không chính thức bao gồm trong bản phát hành mặc định.


  • Windows Phone Connect Tool - cụ thể là nhắm mục tiêu Windows Phone 7 phát triển, công cụ này (kèm trong SDK cập nhật tháng Mười) sẽ cho phép bạn gỡ rối phương tiện truyền thông khả năng trên thiết bị mà không cần chạy phần mềm Zune.


  • JSON.NET- theo mặc định. từ NET Framework không cung cấp nhiều công cụ JSON, thư viện này là một đá quý cho những người làm việc với dựa trên phản ứng JSON (đặc biệt là khi làm việc với các API web).


  • NHibernate - một bên thứ ba công cụ ORM cho NET.


  • SSH.NET - một thư viện lớn để thử nghiệm với lệnh SSH.


  • Tortoisesvn - Công cụ quản lý mã nguồn miễn phí.


  • Log4net - thư viện mã nguồn mở, giúp lập trình viên có thể log lại các hoạt động của ứng dụng.


  • WPI (Web Platform Installer) - công cụ miễn phí, giúp chúng ta có thể dễ dàng có được các thành phần mới nhất từ Microsoft hoặc dễ dàng cài đặt và chạy các ứng dụng web, blog miễn phí khác.


Tôi sẽ giữ danh sách này được cập nhật, vì vậy nếu bạn có bất kỳ đề xuất (các công cụ hoặc các thư viện để thêm)

Translate and Edited by quachnguyen at: http://dotnet.dzone.com/articles/net-developer-tools-what-you

"

how to use Except keyword in linq

how to use Except keyword in linq: "

The Except operator produces the set difference between two sequences.


public static IEnumerable<TSource> Except<TSource>(
this IEnumerable<TSource> first, IEnumerable<TSource> second);


public static IEnumerable<TSource> Except<TSource>(
this IEnumerable<TSource> first, IEnumerable<TSource> second, IEqualityComparer<TSource> comparer);

Now, lets take a look at example:we will start by creating a new Console Application project, i have a collection of City which have some properties like:


public class City{
public string Name { get; set; }
public string Country { get; set; }
public bool isRead { get; set; }
public string CreatedBy { get; set; }
}


I will initial collection of City by creating chain intial City object


var cities = new List<City>{
new City {Country = 'Vietnam', Name = 'Ha Noi', isRead=false,CreatedBy='quachnguyen'},
new City {Country = 'USA', Name = 'New York', isRead=false,CreatedBy='code2code'},
new City {Country = 'USA', Name = 'Sri lanka', isRead=false,CreatedBy='quachnguyen'},
new City {Country = 'Japan', Name = 'Tokyo', isRead=true,CreatedBy='quachnguyen'},
new City {Country = 'Spain', Name = 'Milan', isRead=false,CreatedBy='code2code'},
new City {Country = 'Spain', Name = 'Real Madrid', isRead=true,CreatedBy='code2code'},
new City {Country = 'Spain', Name = 'Barcelona', isRead=true,CreatedBy='quachnguyen'},
new City {Country = 'Netherland', Name = 'Amsterdam', isRead=false,CreatedBy='quachnguyen'},
new City {Country = 'Vietnam', Name = 'Ho Chi Minh', isRead=false,CreatedBy='quachnguyen'},
};

I have to get a collection of city which the user cannot read (isRead=false) but except the Cities which have created by quachnguyen (CreatedBy=='quachnguyen') so the first of all i will get the list of cities are not created by quachnguyen and don't have the read permission.


var notMyCities = cities.Where(c => c.CreatedBy != 'quachnguyen' && c.isRead == false);

And then i use Except keywork to except notMyCities:


var result = cities.Except(notMyCities);

In the end i will loop through the result and display cities in the screen:


Console.WriteLine('-------------------------------------------------------------');
Console.WriteLine(String.Format("{0,-15} | {1,-15} | {2,-15} | {3,-15}", 'Country', " Name ", " Created By ",
"is Read"));
Console.WriteLine('-------------------------------------------------------------');

foreach (var item in result)
{
Console.WriteLine(String.Format("{0,-15} | {1,-15} | {2,-15} | {3,-15}", item.Country, item.Name,
item.CreatedBy, item.isRead));
}
Console.WriteLine('-------------------------------------------------------------');
Console.Read();

Press F5 and the result will be show in the console as bellow:


The Except operator allocates and returns an enumerable object that captures the arguments passed to the operator. An ArgumentNullException is thrown if any argument is null.


When the object returned by Except is enumerated, it enumerates the first sequence, collecting all distinct elements of that sequence. It then enumerates the second sequence, removing those elements that were also contained in the first sequence. It finally yields the remaining elements in the order in which they were collected. If a non-null comparer argument is supplied, it is used to compare the elements. Otherwise the default equality comparer, EqualityComparer<TSource>.Default, is used.

"

nopCommerce v1.90 released

nopCommerce v1.90 released: "

We are extremely happy to announce the availability of nopCommerce v1.90 for download and upgrade. No major features have been introduced with this release as our development efforts were focused on architecture improvements, further enhancements and fixing bugs.


Highlight features


  • Architecture improvements

  • Improved existing themes (usage of three-column master page & increased page width)

  • Allow store owner to manage category access by customer role (a store owner can deny access to any customer role)


To see the full list of fixes and changes please visit the release notes page.

Or: http://nopcommerce.codeplex.com/


"

Chủ Nhật, 26 tháng 12, 2010

develop entity first in entity framework

develop entity first in entity framework: "

Khi phát triển 1 ứng dụng hay 1 chương trình gì đó, chúng ta đều bắt đầu vào việc phân tích và thiết kế database, sau đó chúng ta mới bắt đầu thiết kế các object, entity map với các table trong csdl của chúng ta. Nhưng đối với entity framework thì chúng ta có thể desgin entity trước, sau đó generate db script và tạo table csdl.

Các các thực hiện:

Đầu tiên tạo 1 website → Add new Item → ADO.NET Entity Model


Hộp thoại kế tiếp xuất hiện yêu cầu chúng ta chọn data từ csdl có sẳn hay entity data model rỗng.


Chúng ta chọn Empty → Finish

Từ màng hình Surface của Visual studio chúng ta chọn Entity từ toolbox hoặc nhấp chuột phải chọn Add → Entity...


Đặt tên cho entity


Ở đây mình named là Customers và khoá chính là id kiểu Int32 Click OK để tiếp tục.

Sau đó Entity Customer available ở surface của visual studio, để thêm các thuộc tính khác mình nhấp chuột phải vào entity customers → Add → Scalar Property


Mình đặt tên là Name kiểu string.

Đây là 1 entity rất đơn giản, cho rằng chúng ta đã xong tất cả việc desgin entiy model, giờ để generate db script, nhấp chuột phải vào surface của visual studio chọn Generate Database from Model.

Mình sẽ tạo 1 database trước sau đó script tạo các table sẽ được exec cho db đó


Click Next

Màng hình summary script của entity Cusomter sẽ hiển thị


Nhấn Finish

Để run script tạo table chúng ta chọn Run


Sau đó table customers sẽ được tạo, và giờ chúng ta có thể viết code business cho Entity Customers

"

Thứ Sáu, 24 tháng 12, 2010

cửa sổ task list trong visual studio 2010

cửa sổ task list trong visual studio 2010: "

Khi chúng ta lập trình 1 user story (SRUM) hay 1 module, thậm chí 1 chức năng nào đó, có đôi khi chúng ta muốn note lại những công việc chưa hoàn thành trong ngày hôm đó, hoặc chúng ta muốn mark đoạn block code nào đó để sau này chúng ta dễ dàng quay lại mà bảo trì.

Từ những nhu cầu thực tế trên Task List window trong visual studio 2010 ra đời (cũng có ở visual studio 2008), để xem cửa sổ Task List: View → Task List (Ctrl + W + T)


User Tasks:
Để tạo 1 task list chúng ta nhấp vào biểu tượng phía sau dropdow User Tasks, 1 Task List bao gồm trạng thái (High, Low hay Normal), tình trạng (completed hay incomplete) và description.

User Comment:
Những block code mà người lập trình viên comment trong code đó


Ở màng hình trên cho thấy người developer đã comment vào trong code tập tin projects.ashx dòng 28, người developer này muốn làm 1 cái gì đó ở dòng 28 này, nhấp double click vào dòng đó chúng ta sẽ được chuyển đến đúng chính xác dòng code đó.


Chúng ta chỉ cần mark ở dòng code mà chúng ta muốn với : //TODO: do it something hoặc //UNDONE: not yet complete

Và khi visual studio thấy những dòng comment này thì nó sẽ add vào cửa sổ Task List, ngoài ra chúng ta còn có thể tự định nghĩa những custom comment như


//TRICKCODE: this code has been trick

Bằng cách vào Tool → Options.. → Task List


Have fun!

"

gửi email bất đồng bộ sử dụng smtp

gửi email bất đồng bộ sử dụng smtp: "

Sử dụng SMTP để send email có đôi khi sẽ chậm nếu như chúng ta send email số lượng lớn (bulk email), may thay SMTP Client cũng support chúng ta send email bất đồng bộ (synchronously), giúp chúng ta cải thiện tốc độ của ứng dụng.

Với việc send email bất đồng bộ, tức là Email sẽ được send SMTP server sử dụng các Threads khác nhau và không cần đợi cho đến khi email có được send hay chưa.


Sử dụng phương thức SmtpClient.SendAsync() thay vì SmtpClient.Send(), hai phương thức này cũng tương đương nhau, nhưng phương thức SmtpClient.SendAsync chỉ thêm 1 tham số User Token, nó là 1 unique object, được truyền vào khi send email.

sc.SendCompleted += new SendCompletedEventHandler(sc_SendCompleted);
object
userState = mail;
sc.SendAsync(mail, userState);

Bởi vì email được send với các Thread khác nhau nên quá trình hoàn tất việc send mail cũng không được tiến hành ngay lập tức, chính vì thề lớp SmtpClient cung cấp 1 event Send Completed email như bên trên, trong hàm này chúng ta sẽ log lại những exception, hoặc tiếp tục send khi email bị Cancelled.


static void sc_SendCompleted(object sender, AsyncCompletedEventArgs e){
if (e.Error != null)
{
log.Error(e.Error);
}
}

Chúc thành công

"

Thứ Tư, 15 tháng 12, 2010

làm việc với session trong HttpHandlers (tập tin ASHX)

làm việc với session trong HttpHandlers (tập tin ASHX): "

Mình đang làm 1 dự án web, tất cả các request gửi bằng ajax lên server và được xử lý trong tập tin ashx (http handler), mình cố gắng assign giá trị và session nhưng không thành công:


HttpContext.Current.Session['isReadLead'] = user.isReadLead;
HttpContext
.Current.Session['isWriteLead'] = user.isWriteLead;

Mình gặp lổi NullReferenceException, mình tự hỏi hổng lẻ mình missing config gì trong web.config, mình thử bật và tắt session state trong web.config, nhưng không có tác dụng, cuối cùng cũng tìm được cách khắc phục, lý do là nếu muốn truy cập hoặc set giá trị cho session, chúng ta phải thực thi (implement) các interface nằm trong namespace System.Web.SessionState sau:


IRequiresSessionState - Thiết lập Http handler cho cả việc read và write (get/set) giá trị session.


IReadOnlySessionState - Thiết lập Http handler cho cả việc read (get) giá trị session.

Hope this help

"

Thứ Hai, 13 tháng 12, 2010

HCM - Thanh lí áo jean xách tay

HCM - Thanh lí áo jean xách tay: "


Áo này người thân bên US tặng, chưa mặc lần nào, còn thơm mùi áo mới, nay cho ra đi với giá là 210K.


Size: S

Call: 084 919123 960 A Hà

Địa chỉ: 247 Lê Niệm, Phú Thạnh, Tân Phú, TPHCM


Ai đi ngang úp dùm, tiểu đệ sẽ tạ lễ :85:


"

Thứ Sáu, 10 tháng 12, 2010

Microsoft Visual Studio 2010 Service Pack 1 Beta

Microsoft Visual Studio 2010 Service Pack 1 Beta: "

This download installs Visual Studio 2010 Service Pack 1 (SP1) Beta. This service pack beta release addresses issues that were found through a combination of customer and partner feedback, as well as internal testing. These service packs offer Visual Studio users improvements in responsiveness, stability and performance. Feedback received during this beta release will be used to deliver a final release of the service pack.

Please Note: This installer is for all editions of Visual Studio 2010 (Express, Professional, Premium, Ultimate).

http://bit.ly/fK9Tzh

"

Thứ Năm, 9 tháng 12, 2010

hiển thị line number of code và code tracking change trong vs2010

hiển thị line number of code và code tracking change trong vs2010: "

Để biết được thứ tự dòng code trong viusal studio 2010 chúng ta vào Tool → Options → Text Editor → C# (ngôn ngữ mà bạn refer) hoặc All Language nếu muốn apply cho tất cả ngôn ngữ.


Tracking change là tiện ích giúp chúng ta có thể theo dỏi được dòng code hiện tại nào đã được thay đổi.

Để enable Tracking Change: Tool → Options → Text Editor → Generate → Check vào Tracking Change


Và mổi lần chúng ta thay đổi bất cứ dòng code nào trong IDE thì chúng ta sẽ thấy màu xanh


Ngoài ra nếu dòng code đã thay đổi và chưa được save thì nó sẽ có màu vàng.

Have fun

"